description

Smarter Cookie: a blog for cooking, baking and everything in between...

Search This Blog

Wednesday, January 28, 2009

Oatmeal Toffee White Chip Cookies

I know it's a mouthful of a name, but this cookie is chock full of goodness. I bought toffee bits because I thought I was going to make a different cookie recipe, but I went on to the Hershey's website and found a Oatmeal Toffee Cookie and thought it looked pretty good. I decided why not, lets give it a try and let me tell you they smell so good. The toffee and white chocolate in a wholesome oatmeal cookie. Wow this cookie is good and it is a little different which made me really like it.


Oatmeal Toffee White Chip Cookies

1/2 cup unsalted butter, at room temperature
1 egg
1 tsp vanilla
1 cup light brown sugar
1/2 tsp cinnamon
1 1/2 cups quick-cooking oats
3/4 cup plus 2 Tbsp all-purpose flour
1/2 tsp baking soda
1/4 tsp salt
3/4 cup plus 2 Tbsp Toffee Bits
1/2 cup white chocolate chips

Preheat your oven to 350 degrees. Beat the butter and the sugar together on a medium speed until creamy. Add in the egg and once incorporated add in the vanilla.


In a medium size bowl mix all of the dry ingredients and then slowly add it into the butter and egg mixture. Once the dough has formed add in the toffee bits and the white chocolate chips stir to combine.


Scoop a big tablespoon and place on your baking sheet. I use a large ice cream scoop which is more like 2 generous tablespoons. Bake at 350 for 14-17 minutes. Let them sit on the tray for one minute before taking them off the baking sheet and place on a cooling rack. I got 15 cookies from this recipe.


These may show up at the super bowl party...if there are any left! These are really yummy cookies.

Monday, January 26, 2009

Cookies and Cream Fudge

So I've been trying to figure out what I want to make for the Super Bowl, and I'm not sure, but I thought if I make a few experimental things and bring them all, one is sure to be good.


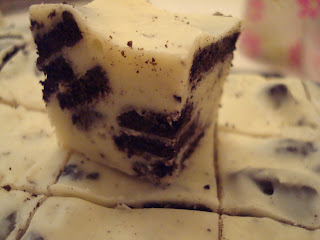
Tonight I decided to try a recipe that I saw on Nosh With Me. It is for Cookies and Cream Fudge. Most people love oreos and fudge so together, to me, it sounds like a winner.

Cookies and Cream Fudge

18 oz white chocolate chips
1 (14 oz) sweetened condensed milk
1/8 teaspoon salt
3 generous cups (about 25 cookies) coarsely crushed oreos

In a medium saucepan, over low heat, melt white chocolate, condensed milk and salt. Remove from heat and stir in crushed cookies.


Spread evenly into a wax paper lined 8-inch square pan. Chill 2 hours or until firm.


Turn fudge onto cutting board; peel off paper and cut into squares. Store leftovers covered in refrigerator, or freeze until you need it.


I think all the football crazed boys and girls will love this sweet treat amongst the chips and dips. My roommate did steal a bite and say that it was extremely good. So another winner!

Sunday, January 25, 2009

Whipping Cream Coffee Cake

I finally found a solution to what to do with extra Whipping Cream. Make a coffee cake with it!

I originally bought whipping cream to make Abby's No-Bake bars. If you like making homemade whipped cream, you are in luck for what to do with the extra whipping cream, but if you are like me, the left over carton was sitting in the refrigerator waiting to go past the date so I could throw it away. And that seemed like a complete waste.


I scoured the internet searching and searching for something to make with the whipping cream. Finally I found a simple cake recipe that seemed too good to be true, but very plain. I figured nothing terrible would happen if I added some flavor to the cake. I assumed by looking that the ingredients that the texture of the cake was going to be somewhat light and fluffy like a pound cake but also be creamy both because of the whipping cream, and this would be a great coffee cake base. I added a filling and miraculously it all worked out. This is a great solution to the left over whipping just sitting in your refrigerator waiting to get old. This cake might even be a reason to go out a buy whipping cream it is that good!

The only change I would make next time I make this cake is that I would make 1 and 1/2 of the cake recipe to fill the 8 inch loaf pan better. The original recipe is below. As you can see from the pictures it came out a bit too thin. You could also double the recipe and use a bunt pan.


Whipping Cream Coffee Cake


Cake

1/2 cup whipping cream
1 egg
1/2 cup granulated sugar
1/2 tsp vanilla
1/8 tsp salt
1 tsp baking powder
3/4 minus 1 Tbsp all purpose flour

Filling

1/2 cup toasted walnuts
1 1/2 Tbsp granulated sugar
1 1/2 Tbsp light brown sugar
1/2 Tbsp cinnamon
1/2 Tbsp cocoa powder

Preheat your oven to 350 degrees. Pour the whipping cream into a bowl and with an electric mixer beat until it is fluffy. Add the egg and continue beating. Once combined add the vanilla and the sugar to the whipping cream mixture, and beat. Once the sugar and the vanilla are combined in the mixture you want to take off the whisk attachment on your mixer and fold in the dry ingredients. This is important so the air that you beat into the whipping cream, stays and the cake will rise.


Combine the filling ingredients in a small bowl and stir to combine.

Place half of the cake mixture into a greased 8 inch loaf pan. Sprinkle the filling mixture over the top then cover the filing with the rest of the batter. Please not you may not use all the filling, just coat the batter with a thin layer.


Place in the oven for about 30-35 minutes until a cake tester comes out clean. Let rest and cool for about 30 minutes before releasing from the pan.


Serve and enjoy!

Thursday, January 22, 2009

Peanut Butter Chocolate Chip Bars

I've been on a bar making kick lately. I found a recipe that I have sited before for Blondies that can be turned into just about anything you want. Today I had left over peanut butter, and peanuts from the No-Bake bars that I made earlier this week and decided to make some Peanut Butter Chocolate Chip Bars. Yum!


Hopefully everyone at work will love this new creation.

Peanut Butter Chocolate Chip Bars

1 stick unsalted butter, melted
1 cup dark brown sugar
1/4 cup creamy peanut butter
1 egg
1 tsp vanilla
pinch of salt
1 cup all-purpose flour
1/2 cup chopped peanuts*
1/2 cup milk chocolate chips
1/2 cup semi-sweet chocolate chips

*I used Cocktail peanuts, salted but really any kind you have on hand will work for this recipe.


In a medium sized bowl melt the butter and whisk in the sugar, once combined add the peanut butter, vanilla and the egg. Stir until homogeneous. Slowly stir in the flour. Once all combined add in a little less than 1/2 a cup of each of the chips and the nuts.


Pour into a greased pan, sprinkle the remaining chips and nuts over the top of the bars. Place in a 350 degree oven for 20 to 25 minutes. Let cool for at least an hour before cutting. And serve or freeze.


Chocolate and peanut butter a classic, yummy combination that will always be loved by all.

Monday, January 19, 2009

No-Bake Butterscotch Treats

I rarely make something a second time, when I'm not satisfied with the outcome the first. Honestly I think these no-bake bars look gross. The ingredient list seems like there is too much going on, but people love these bars, and I'm not sure why. They have said that they taste like cookie dough and they're great. So they're really easy to make, being no-bake bars so try them and see for your self...The recipe comes from better homes and gardens cook book.


These are going to Abby, Ben's younger sister who is going on a semester away in just a few weeks. A year after I made these the first time she was still talking about them as the best thing she had ever had, so I want to send her away with a little bit of home baking before she is gone for 5 or 6 months. So good luck Abby, have a wonderful, wonderful time and don't forget about us at home while you're experiencing everything and anything out there in the big world. We love you.


No-Bake Butterscotch Treats


6 Tbsp unsalted butter, melted
1 cup creamy peanut butter*
1 1/2 cups powdered sugar
1 9 oz package chocolate wafers, crushed**
1 12 oz package butterscotch chips
1/4 cup whipping cream
1/4 cup cocktail peanuts, chopped

*I used skippy natural peanut butter, anything you have on hand will work.

**I bought a snack bag of mini Oreos (8 oz) and crushed them in the bag. This was a good way to not have left over Oreos hanging around.


In a medium sized bowl whisk together the melted butter, peanut butter, powdered sugar, then stir in the chocolate wafers. Press mixture into a 13 by 9 pan (ungreased.)


In a small saucepan melt the butterscotch pieces with the whipping cream over low heat, stir until smooth. Pour over top of wafer crust. Sprinkle the peanuts over the top and gently press into the butterscotch so they stay.


Cover and chill at least 2 hours. Slice into bars and serve. I would refrigerate or freeze until you need them they will stay better together cold. Enjoy!

Thursday, January 15, 2009

Super Fudgy Brownies II

Just a quick post today...Last night I made these Super Fudgy Brownies again, however I changed two things in the recipe. We'll have to do a taste test to see which is preferred. I changed the chocolate that I used, originally I melted down bittersweet chocolate and in this version I used semisweet chocolate and added walnuts. They came out looking great!

I really liked this recipe, these brownies are really fudgy and look so good and they can be made start to finish in 45 minutes (and most of that time is baking time.) A really great, easy brownie recipe.


Super Fudgy Brownies

5 oz semisweet chocolate
2 oz unsweetened chocolate
8 Tbsp unsalted butter
3 Tbsp unsweetened cocoa powder
3 eggs
1 1/4 cups granulated sugar
1 1/2 tsp vanilla extract
1/2 tsp salt
1 cup all-purpose flour
1 cup chopped walnuts

Preheat oven to 350 degree F. Line an 8 inch metal pan foil and spray foil with cooking spray.


Melt both chocolate and butter together in a metal bowl set over a pan of barely simmering water, stirring often. Or you can use my method of popping the chocolate and the butter in the microwave and melt it that way. You do have to check it every 20 seconds to start and then more often as it melts, you want to make sure you do not burn the chocolate (it is a lot easier in a double boiler because there is no chance of burning the chocolate. It a slower method but and it is more gentle for the chocolate.) Stir in cocoa powder. Remove from heat to cool slightly.


Whisk in to the chocolate mixture the sugar and then the eggs one at a time, vanilla and salt. Make sure that the chocolate mixture is not too hot when you start adding the eggs in, you do not want to have scrambled eggs in your chocolate. Fold in the flour and stir until blended. Pour into pan. (if using nuts you can line them on top of the mixture.)

Place into the oven for 25 to 30 minutes. A brownie with nuts in it will take a little longer to cook than without. This version was closer to the 30 minutes, than 25 with the original recipe. A cake tester or tooth pick should come out clean or with small crumbs when these brownies are done. Let sit on the counter to cool 1 to 2 hours, or you can put these in the refrigerator to cool (they will cut easier if they are cold.)


These will be going to a Birthday celebration on Friday. (Happy Birthday Steve!)

Wednesday, January 14, 2009

Seared Scallops with Asparagus & Linguine

Ben and I had a small celebratory dinner last night, just a little nod to the fact that we have now been together for 2 and a 1/2 years. We don't really celebrate anniversaries, why if we love each other why do we have to congratulate ourselves for sticking in the relationship? We are together and it's great, there is no reason to count or list the days, hours, minutes that we've lasted.

But nice dinners together are something that I think we both cherish, so there is no reason that we can't do that on a weekly basis, and just enjoy each other.


I sent Ben a few different options for dinner. We decided on a pasta dish because neither of us could remember the last time we had pasta (which is almost a crime.) We also like trying new things and neither of us had ever made scallops before, and they are a food that we both like. So we experimented, guided by a cooking light recipe.

Seared Scallops with Asparagus & Linguine

1 (9-ounce) package refrigerated linguine
1 bunch asparagus
1/4 cup plus 2 Tbsp Romano cheese, divided
2 Tbsp olive oil, divided
Handful of chopped fresh basil
1 teaspoon black pepper
1 teaspoon salt
3/4 lbs sea scallops
1 lemon

In a medium size pot bring the water to a boil to cook the pasta. While waiting for the water to come up, rinse and cut the asparagus into bite size pieces. Once boiling place the asparagus in the water, let come up to a boil again and then add the pasta in. Cook according to the package (2-3 minutes) then drain pasta and asparagus in a colander over a bowl. Combine pasta, 1/4 cup cheese, 1 tablespoon oil, chopped basil, the juice of 1/2 a lemon and pepper in a large bowl; toss well.

Heat remaining 1 tablespoon oil in a large cast-iron skillet over high heat. Sprinkle salt evenly over scallops; add scallops to pan. Cook 1 minute on each side or until golden.


Serve pasta with scallops on top and extra lemon wedges on the side. Sprinkle with cheese to finish the dish.


So the pasta was good, not great, the flavors were there that Ben and I love but we had a few issues with the dish. First, apparently I don't like fresh pasta, for some reason the texture was too chewy, it stuck together and I just didn't enjoy it. So if we make this again the first thing we would do differently is use dried pasta.


The second thing we would do is not over cook the scallops. I said "Ben it says scallops one minute on each side, that's it, don't over cook the scallops" about 7 or 8 times before we started to cook them. (Ben was in charge of the scallops while I did the pasta.) It got to the point where I knew I was annoying him, but I had this feeling that he would cook and cook and cook the scallops and they would be like rubber. Well...that's exactly what happened. We sat down to eat and Ben popped a scallop in his mouth, looked at me and smiled..."I over cooked the scallops," he said. Oh well...at least we'll know for next time. I'm sure that we will make scallops again, I can't wait to perfect it.

One last thing that we would change, adding the cheese to the pasta while it was hot made one big clump of cheese in the middle of a bunch of pasta, because the temperatures of the cheese and the pasta were too cold to have the cheese mix in well, so I would just take that whole part out and add the cheese on the top over everything at the end. I would also next time use Parmesan cheese not Romano.

But all that said, the flavors were there, the lemon, asparagus, seared scallops, it was yummy and I can't wait to redo it and make the dish really a winner. Ben took the leftovers to work today for lunch so...it was good enough to keep and eat again, just not as fabulous as we thought.


The night was not ruined because this is what we love, to cook, eat and be together, it's fun to be in the kitchen, mixing, stirring and pouring. I boss Ben around, his dinner gets cold while I try and take a million pictures and for us, this works.

Tuesday, January 13, 2009

Super Fudgy Brownies

This may or may not be the last thing that I make for my local sorority girls, but we're getting close to the end of the cookie and bar donations.


There are people, strange people that like cakey brownies, my family was not part of that group. I remember these brownies that my mother always made, none of us liked them. You needed a glass of milk during the eating process because they were so dry you could hardly swallow, not a glass of milk to cut the richness of the chewy, fudgy goodness. Needless to say I will probably not ever make a cakey brownie unless asked to by someone else. I just don't prefer them, and why give other people something that you don't believe in? That just seems silly.


I found this fudgy brownie recipe from Cookie Madness and then accessed the original recipe from recipezaar. I decided to make these because Anna from Cookie Madness said that these were maybe the best brownies that she ever made. I have to say they were really easy and really good. A fabulous recipe all around.

Super Fudgy Brownies


5 oz bittersweet chocolate
2 oz unsweetened chocolate
8 Tbsp unsalted butter
3 Tbsp unsweetened cocoa powder
3 eggs
1 1/4 cups granulated sugar
1 1/2 tsp vanilla extract
1/2 tsp salt
1 cup all-purpose flour
Walnuts for top (optional)

Preheat oven to 350 degree F. Line an 8 inch metal pan foil and spray foil with cooking spray.

Melt both chocolate and butter together in a metal bowl set over a pan of barely simmering water, stirring often. Or you can use my method of popping the chocolate and the butter in the microwave and melt it that way. You do have to check it every 20 seconds to start and then more often as it melts, you want to make sure you do not burn the chocolate (it is a lot easier in a double boiler because there is no chance of burning the chocolate. It a slower method but and it is more gentle for the chocolate.) Stir in cocoa powder. Remove from heat to cool slightly.


Whisk in to the chocolate mixture the sugar and then the eggs one at a time, vanilla and salt. Make sure that the chocolate mixture is not too hot when you start adding the eggs in, you do not want to have scrambled eggs in your chocolate. Fold in the flour and stir until blended. Pour into pan. (if using nuts you can line them on top of the mixture.)


Place into the oven for 25 to 30 minutes. A cake tester or tooth pick should come out clean or with small crumbs when these brownies are done. Let sit on the counter to cool 1 to 2 hours, or you can put these in the refrigerator to cool (they will cut easier if they are cold.)


These came out very fudgy and yummy. You definitely need to have them with a large glass of milk or a big bowl of ice cream as my roommate did. Great brownies!

Monday, January 12, 2009

Oatmeal Raisin Craisin Bars

So I made up a recipe. Based off of another recipe of course, but it's all mine. It probably needs some tweaking but YAY, my first and hopefully not my last experiment into creating my own lovely baked goods. And...they were good!


These will also be heading off to the Boston University chapter of Alpha Delta Pi for all of the amazing girls to consume.

Oatmeal Raisin Craisin Bars

2 sticks unsalted butter, room temp
1 cup dark brown sugar
1 cup light brown sugar
2 eggs
1 1/2 tsp vanilla extract
3/4 tsp cinnamon
1/4 tsp pumpkin pie spice
1/4 tsp salt
1 cup flour
1 1/4 cut quick cooking oats
1 cup raisins
1 cup craisins
(walnuts optional 1/2 cup)

Preheat your oven to 350 degrees. Grease the bottom of a 9 by 13 inch pan. In a mixing bowl melt the butter and then whisk in the sugars. Add in the eggs one at a time and stir to combine. Add the vanilla, and stir. Add in all of the dry ingredients and max sure it is all well mixed. Fold in the raisins and the craisins (if you are using nuts add them here too.) Pour into your prepared pan and bake for about 25 minutes. Let cool and then cut when the bars are at room temperature.


They are a really good and easy alternative to making brownies or other bars, or if you are craving oatmeal raisin cookies these give you that flavor without all the scooping and drop work of cookies. Pour, bake and cut. Easy.


I really hope you enjoy these new bars. I did and I know Alpha Delta Pi girls will as well!

Sunday, January 11, 2009

Triple Chip Cookies

This is the second year that I will be donating cookies to the Boston University chapter of my sorority, Alpha Delta Pi. Last year in a news letter I saw that this chapter needed some help during their recruitment. I was willing an eager to help. I volunteered to make them a lot of chocolate chip cookies, I think last year it totaled about 100 cookies. This year I wanted to try out a new chocolate chop cookie recipe and also make them a few other things (you'll see those in some future posts.)


Triple Chip Cookies

1 1/2 cups unsalted butter, softened
1 1/4 cups granulated sugar
1/4 cup packed dark brown sugar
1 cup packed light brown sugar*
1 Tbsp vanilla
2 eggs
4 cups all-purpose flour
2 tsp baking soda
1/2 tsp salt
1 12 oz bag semisweet choclate chips
6 oz dark chocolate chips
6 oz milk chocolate chips

*If you do not have both kinds of brown sugar you can just use a total 1 1/4 cup of whatever brown sugar is in your cabinet.


Heat oven to 350°F. In large bowl, beat butter, sugars, vanilla and eggs with electric mixer on medium speed until light and fluffy. Stir flour, baking soda and salt in a bowl and then add it into the butter mixture. Stir in chocolate chips.

Scoop on to an ungreased cookie sheet, drop dough by tablespoonfuls or ice cream scoop leave about 2 inches apart for spreading.


Bake around 13 minutes or until light brown (centers will be soft). Cool 1 to 2 minutes on the sheet and then remove to a cooling rack. I made 38 larger cookies.


The original recipe for these cookies can be found here. I was a little unhappy with the final look of these cookies I thought they didn't rise enough in the oven and were a little bit too greasy out of the oven. Overall the taste was great and enjoyed. I can't wait to give these to my local sorority sisters hopefully the cookies will give them the energy to smile and talk to hundreds of college freshmen and sophomores who may want to join Alpha Delta Pi.

Tuesday, January 6, 2009

Shrimp, Chicken and Tofu Stir Fry

Happy New Year everyone! I hope you all are enjoying the new year so far. I know that many people have made New Years Resolutions that include getting healthier, working out more and being overall happier with yourself. Ben and I are part of this group that made these resolutions and we've both stuck to it for the past 6 days. :)

The past few nights for dinner I've been experimenting with an Asian vegetable mix, and tonight Ben and I added Shrimp, Chicken and Tofu to the mix. It turned out really good. I accomplished making two new things (Shrimp and Tofu) and succeed in part of my resolution to try and eat more balanced, healthy meals. On my own I tend to not eat enough protein so experimenting with Tofu and Shrimp tonight was very exciting. I did try the shrimp, however I have to say it is not on my list of seafood that I like. Ben ended up eating 5 and 3/4 of the 6 shrimp we cooked.


Ben and I agreed that it was a great meal, easy, super fast and great for you. I'm not sure anyone would be looking for anything different in the New Year.


Shrimp, Chicken and Tofu Stir Fry

1 boneless skinless chicken breast
6 large shrimp, peeled and devained
1/4 block extra firm tofu
1/2 tsp chopped fresh ginger
6 Tbsp low sodium Soy sauce
1 tsp hot sesame oil
3 cups Oriental Style frozen vegetables*
1/4 tsp red pepper flakes
salt
pepper
rice noodles (we followed the packaging and made about 2.5 servings at 150 calories per serving)

*French green beans, onions, broccoli, and mushroom mix.

Slice the raw chicken breast into bite size pieces. I cut the chicken on an angle so that the slices were thin and would cook as fast as the shrimp. Add the chicken and shrimp to a bowl with 3 Tbsp Soy sauce, 1/2 tsp hot sesame oil and the ginger. Let marinate for anywhere from 20 minutes to an hour (or more if you have the time.) Slice the tofu into whatever size pieces you want to use and set aside.


Cook the rice noodles according to the package. While the noodles are cooking place the vegetables in a sautee pan, and let cook until warmed through (about 5 minutes) add the shrimp, chicken, tofu and marinate mixture to the pan. This will all cook very quickly, you will only need to make sure that the chicken is no longer pink and the shrimp is just turning white and pink. Add the rest of the soy, oil and the spices. Stir to combine.


Drain the rice noodles and spoon the vegetables mixture on top and pour any extra liquid over everything. This made two servings perfectly. Eat and enjoy, we did!