description

Smarter Cookie: a blog for cooking, baking and everything in between...

Search This Blog

Tuesday, October 28, 2008

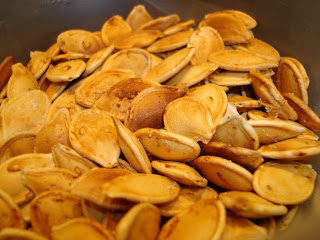
Roasted Pumpkin Seeds

Ben and I took Monday off of work, so that we could play and continue celebrating my birthday (yes I am officially 23.) We decided that we had waiting long enough and it was time for pumpkins. Carving pumpkins and roasting pumpkin seeds something that we have been doing together for the past three years, but Ben has been doing his entire life. Ben introduced me to pumpkin seeds, I had never had them before, they went in the trash with the innards of the pumpkins while carving. But they are so good and should never be thrown out. They should be roasting and smelling up the entire house while the festivities of carving occur.


We had so much fun and it was a good final day of my birthday.

Roasted Pumpkin Seeds

Pumpkin seeds
Salt
Olive Oil*

*This year Ben used Pam instead of Olive Oil. This makes the snack even better for you. You are getting the heart healthy nutrients from the seeds, and while olive oil is good oil for you it does add fat and calories. Use whichever you want.

Once you have opened your pumpkin and pulled out all the seeds you want (in our case it was 4 pumpkins worth which filled one of the big glad tupperware.) Rinse in a colander under warm water until all the orange pumpkin had fallen away. Try and get off as much water as you can. If you try using paper towels the seeds will stick making more work for you. On a cookie sheet coat with tin foil and spray with pam. Ben spreads salt on the bottom and then puts one layer of seeds on the tray, and the coats again with Pam and salt.


Place in a 400 degree oven. Now for cooking time watch them at 20 minutes however depending on size they may take up to 35. They should be golden brown when you take them out. Coat with more salt to taste, store tupperware for as long as they will last, which will not be long. Ben ate himself into a stomach ache the first afternoon we made them. :)

Saturday, October 25, 2008

Pumpkin Chocolate Chip Cookies

If you didn't know before, you'll know now. Ben loves pumpkin. I decided to make this recipe not only for Ben but to bring into work for Halloween as well. Therefore I needed a lot of cookies to feed the troops at work and the boys for Sunday Football. I changed the original recipe slightly but it can be found here. I loved this recipe because it was easy: measure, pour and mix.


Pumpkin Chocolate Chip Cookies

1 can canned pumpkin (almost 2 cups)
2 eggs
1 3/4 cups sugar
3/4 cup vegetable oil
2 tsps vanilla extract
2 tsps cinnamon
1 tsp salt
1 tsp baking soda
3 tsps banking powder
2 cups all-purpose flour
2 1/4 cups semi-sweet chocolate chips

In a bowl with an electric mixed beat pumpkin, eggs, sugar, vanilla, cinnamon, oil, salt, baking soda and baking powder until smooth. Slowly add the flour and beat until just combined. Add in the chocolate chips. Drop in rounded tablespoons on a cookie sheet, bake for 10 minutes in a 375 degree oven. (My oven bakes faster than others I think so you may have to leave it in for a few extra minutes.) Cookies should be golden on the bottom and sides. Remove from sheet and cool. Makes 48 cookies.


I really liked this recipe not only because it was easy but because they came out with a cake consistency. I think this made the pumpkin cookies so good, they were not a typical taste or feel of a chocolate chip cookie.


And when I told Ben that I made Pumpkin Chocolate Chips Cookies for game day his face lit up with a huge smile.

*I brought these into work for Halloween and they literally were the fastest eaten cookies I've ever brought in...And in the past 2 year I've brought in quite a few dozen kinds of cookies and brownies. A new favorite recipe that I will make again and again.

Sunday, October 19, 2008

Green Chile Cornbread

So I made this also for Ben and all the boys that would be piling into the smallest tv room ever to watch the Red Sox tonight...the bread sticks seemed perfect, but a little too easy. Today I needed a challenge. This recipe from Simply Recipes was perfect.


I did change a few things to the recipe, so my edited version is below.

Green Chile Cornbread


1 1/4 cup plus 2 Tbsp cornmeal
1 cup all purpose flour
1 1/2 tsp salt
1 tsp baking soda
1 tsp baking powder
1/4 cup sugar
1/2 cup sour cream
2 eggs
1 3/4 cup whole milk
2 cups chopped roasted green chiles*
1 1/4 cup Cheddar Jack cheese

*You can used can roasted green chiles (if you can find them) which I could not so I bought Anaheim Chiles and did it myself. All you need to do is put the chiles in an oven under the broiler until the skins are burned. Or how I did it was just hold it over my gas flame and rotate until all sides are chard. Place right into a paper bag. This will steam the chiles and the skin will peel back easier. Peel, and chop.

Preheat your oven to 400 degrees


In a medium sized bowl combine the baking power, baking soda, salt, corn meal, and flour. In an electric mixing bowl cream the butter and the sugar add the sour cream and eggs. Add the dry ingredients and the milk alternating until fully mixed. Stir in the cheese and the chiles. Pour into a greased 9 by 13 baking dish.

Bake for about 30 minutes until a cake tester comes out clean, the top should be light brown. Makes 24.


This was so good, it was a little on the moist side for corn bread so maybe next time I would add a little more flour and a little less cheese. But overall it was yummy and spicy and another perfect snack for the game. I hope the boys like it, actually I know they'll love it. This is something a little unexpected, but adds flare to good old corn bread. Try it. :)

Cheesy Breadsticks

Now let me start this post by saying you must try this. Now they are not earth shattering, but they are great, a solid snack, accompaniment to a meal, or an addition to game day snacks. The reason you must try these for the ease in preparation, baking and making they are super easy and super good.


Cheese and Rosemary Bread Sticks


1/2 cup grated Parmesan cheese
3/4 cup small shredded Gruyere cheese
2 Tbsp chopped fresh Rosemary
2 11 oz containers refrigerated bread stick dough*

*You can also use refrigerated pizza dough too.

Preheat your oven to 350 degrees. In a medium sized bowl combine the cheeses and the Rosemary. Separate the dough (or cut if you are using pizza dough) into strips. Take each strip and coat with the cheese rosemary mixture, twist and place on baking sheet, make sure you spread them enough because they will grow. Bake until golden brown 10 to 15 minutes. Serve warm right away. This made about 50 bread sticks, if you don't need enough for an army of men, than just go ahead and halve the recipe.


I packed these up and brought them over to Ben's (yes Ben has moved since the last time I posted) where there are 10-15 hungry boys waiting to watch the Red Sox tonight. Easy, yummy and what more could you want.

Oh and I have the food network to thank for this recipe, the original can be found here.

Look Who's Back

It's me. I'm not sure if I'm back 100% but there is a huge reason that I did not take down my blog, because I did, I do want to get back into it. So I start here with two new recipes.