description

Smarter Cookie: a blog for cooking, baking and everything in between...

Search This Blog

Monday, March 31, 2008

Potato Latkes the Wrong Way

You didn't think we could do it, did you. Potatoes, again. Oh but we were able to. I mean what's a Sunday without Sunday morning potatoes? As I've told you before, I generally wake up before Ben and lay in bed contemplating this weeks Sunday morning Potato experience. This week, I had just one red potato to use, well I mean I had more potatoes, but potato is just one part of Sunday morning breakfast (except last week when I was too lazy to stock up on groceries.) This week I tried to go above and beyond for Sunday morning. It included Red Potato Latkes, an Everything bagel, and good old scrambled eggs (plain and simple.)


Potato Latkes are a traditional Jewish food and I think each family has their own recipe. I know how to make MY mothers potato latkes, but this Sunday morning when I was only making one potato I had to tailor the recipe a little, because the quantity of potato was so small. Latkes are traditionally fried in vegetable oil and appear at a majority of the holidays but especially during Channukah where the celebration of oil burning for 8 nights is celebrated with fried foods. These are good as a side dish, main coarse (just add sour cream and sugar or applesauce) or as we found out this week as a Sunday morning addition.


The reason why these potatoes are titled the wrong way because the recipe is a little different, and I think made these latkes special, not necessarily better than traditional ones, but still good enough for Ben to gobble up and ask for more.

Potato Latkes the Wrong Way
(small batch)
1 medium Red Potato
1 Egg Yolk
2-3 Tbsp All-Purpose Flour
1/4 tsp Salt
1/4 tsp Pepper
1/8 tsp Garlic Salt
1/4 tsp dried Parsley

Grate entire potato on the thicker side of a hand grater. If you do it too small you'll end up with potato mush. You want it about the same side as if you were making hash browns. Add in yolk and flour and mix until you have a little bit of a bater with the potato, egg, flour mixture. Meanwhile in a sautee pan heat vegetable oil to medium high heat. Add seasonings to the potato mixture and stir to combine. Once oil has heated spoon potato into the pan and let cook until golden brown about 5 minutes or so. Flip and let the other side brown. Once finished on both size, about 10 minutes (depending on how big you make your latkes) let sit on a paper towel to drain any excess oil. You want the outside to be crunchy. Then eat!


Normally you would be making more than one potato and I would then recommend using the entire egg and additional flour (to make a smooth consistency.) I would also say that if you have a fry-a-lator or a deep set pan to fill with oil and really fry these potatoes instead of my quick-fix apartment style solution. You can add in a cut up sauteed onion to the mixture or any seasonings that you prefer. Its really a great recipe that you can tailor to the tastes you like. Red potatoes are not the traditional, either Yukon gold or Idaho potatoes are really what most people use. But use what you have and make it how you like.


So try it out. Its good the wrong way.

Tuesday, March 25, 2008

White Chicken Chili

"Wanna make dinner tonight?" I asked Ben over AIM this afternoon. His answer was "Yes!" Which surprised me because I thought he'd be to tired and hurting too much after spraining his ankle at basketball last night. But to my astonishment he wanted to, and there started the back and forth...fish? chicken? chili? Chili! Such a good idea. I browsed my usual favorite blog sites and also food network and sent Ben some of the best of the best looking recipes. We settled on this one. I originally found it here, but want to give the original blogger its due.


We made a few slight changes one because I don't eat garlic. I know, i know everyone loves garlic but I, I hate it. So when Ben and I make dinner together theres no garlic in anything. As you can tell I will make Ben food with garlic in it, but I will not eat it myself. So we had to omit and we added a few things to compensate. It turned out really great. I've never had a white chili before, this was a really nice alternative to regular chili. Its not weighted down with all the heavy meats and oils and tomatoes as regular chili's are. So try it but don't expect it to be normal, but do expect greatness.

White Chili


1-1/2 tablespoons olive oil
2 medium onions
2 jalapeño peppers
1/4 inch minced ginger root
1 lb chicken breast
5-6 white mushrooms
1 tablespoon flour
2 cups chicken broth
2 15 oz cans white beans
1/4 cup chopped cilantro
1 bay leaf
1 teaspoon dried oregano
2 teaspoons cumin
1/2 teaspoon salt
1/2 teaspoon black pepper
1 small tomato
3 green onions
jalapeño hot sauce

In a large sauce pan over medium heat pour in oil and bring up to temperature add chopped onions and chopped jalapeño pepper and cook, stirring occasionally, for 5 minutes. Add ginger and cook until fragrant, another minute. Add chicken and sliced mushrooms. Cover and cook for 5 minutes, stirring occasionally to cook chicken on all sides.


Sprinkle in flour and stir to coat (this is the thickening agent to help the broth get to that chili consistency rather than soup.) Cook, stirring constantly, for 1 minute. Add broth, beans, cilantro, bay leaf, oregano, cumin, salt and pepper. Cover, reduce heat and simmer until vegetables are tender and chicken is cooked through will be about 15 minutes.

Discard bay leaf and then spoon chili into bowls and garnish with tomato, green onion and a few shakes of hot sauce.


We really liked this chili, we especially liked adding in the extra jalapeño and hot sauce. It really made the spiciness and the flavors of the other spices come through. The chicken was so tender after simmering in the liquid for a while. I would defiantly recommend trying this recipe.


Yummy, spicy, healthy...is there anything better? I'd give it 5 out of 5 stars. :) Enjoy!

Monday, March 24, 2008

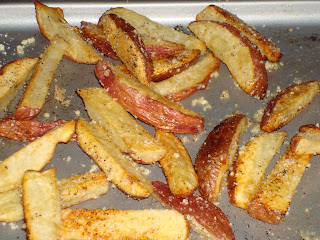
Roasted Garlic Parmesan Red Potato Fries

Another Sunday morning, means another take on potatoes. This Sunday morning I woke up, way earlier than Ben did and laid in bed thinking how can I revamp the usual Sunday morning potatoes. This week I had bought red potatoes which according to Ben are his favorite. I like them as well, they have a nicer flavor than just regular potatoes I think, and are generally a lot smaller and will cook up faster. Having no microwave (I know its been a rough few weeks to exist without one) I had to make these potatoes the old fashioned way...in the oven. So therefore it was actually good that I was up earlier than Ben becasue the usual 10 to 15 minutes it takes me with a microwave to make Sunday morning potatoes tripled to 45 minutes for these potatoes.


After a late night including a few drinks I was thinking what are the best flavor combinations to help that head ache and stomach turning feeling go away. Ben loves garlic and makes his own version of baked garlic fries, and I thought that flavor with a dusting of Parmesan cheese on top make just cure any hang over.


Roasted Garlic Parmesan Red Potato Fries
2 medium sized red potatoes
1 tsp dried garlic
pinch of cayenne pepper
1 tsp kosher salt
2 1/2 tbsp olive oil
2-3 tbsp grated Parmesan cheese

Preheat your oven to 400 degrees. Wash and dry the red potatoes, then cut lengthwise into fries. Place on a baking sheet and coat with the olive oil. Make sure you toss the potatoes so that each one is coated, then dust the garlic powder and sprinkle just a bit of cayenne pepper over, this will add just a hint of a kick to the taste. Toss again, the easiest way to do this I found was just using my hands. Try and make sure that all of the fries are evenly coated with the spices and oil. Place in your oven for about 30 minutes. Make sure depending on the size of the potatoes or slices that you make to check on them becasue they could bake up a lot faster if smaller, or take longer if bigger. After about 30 minutes make sure to turn the potatoes so that both sides will crisp up on the baking sheet, then sprinkle kosher salt and Parmesan over the potatoes, place back in the oven for 5 to 10 minutes. Make sure you don't leave them in too long after the cheese is added, you just want to heat them with the cheese, and make sure the cheese has stuck to the potatoes by melting slightly.


Take off baking sheet and serve. :)

Saturday, March 22, 2008

Peanut Butter Chocolate Chippers

So these are soooo good. One Saturday morning I made two different kinds of cookies. And like always I brought samples over to Ben's house for a taste test. There is a little secret I have, I can't eat chocolate and therefore cannot taste many of the things that I bake, yes a sad existence. Growing up my favorite anything and everything was chocolate, but due to some stomach issues I can no longer eat any chocolate. I gave one of these to Ben and a sheepish, boyish smile crept across his lips, and instantly I knew. These were good. Not only good, but great, a perfect balance of saltiness from the peanut butter and sweet from the sugar coating and chocolate pieces. The original recipe can be found here. I did like always make a few changes, but nothing too major.


Peanut Butter Chocolate Chippers

1 1/4 cups all-purpose flour
3/4 teaspoon baking soda
1/2 teaspoon baking powder
1/4 teaspoon salt
1/2 cup unsalted butter, softened
1 cup smooth peanut butter at room temperature
3/4 cup plus 1 tablespoon (for sprinkling) sugar
1/2 cup firmly packed dark brown sugar
1 large egg
1 tablespoon milk
1 teaspoon vanilla extract
1/2 cup peanut butter chips (generous)
1/2 cup chocolate chips (generous)

Preheat oven to 350 degrees.

In a medium bowl, combine flour, baking soda, baking powder, and salt, then set aside to use later.

Beat the softened butter and the peanut butter together until fluffy, will become a little lighter in color and may take a minute or two. Add the sugars and beat until smooth. Add the egg and mix until fully combined. Add the milk (can use skim, whole anything you have on hand) also add in the vanilla extract. Finally slowly add the flour mixture to the rest of the batter and beat thoroughly. Stir in the peanut butter chips and the chocolate chips, I think total I had closer to 1 1/2 cups of chips total than the 1 cup in the original recipe. Place sprinkling sugar on a plate. Drop by rounded teaspoonfuls into the sugar and coat fully, then place on cookie sheets. Leave a bit of room for the cookies to expand, however they are not going to grow significantly.


Classically peanut butter cookies have a criss-cross of a fork pattern top partially to flatten out the cookies so that they bake properly and also to be able to instantly pick out which cookies are peanut butter. I wanted these to be a little bit classier and therefore did not use the fork pattern but instead slightly flattened the cookies with a knife. Bake for 10 to 12 minutes, do not over bake. I would stick closely to the 12 minutes. You need to let these cool for a few minutes on the warm cookie sheet before transferring to a cooling rack so that the cookies stay together.


Once cool, eat, but try and keep some for the freezer to use later. This will be hard, but you'll be happy the week after you made these that you still have a special treat to go pull out of the ice box.

Peppermint Jo Jo Brownies

If only I didn't burn the chocolate the first time through, then realize I didn't have enough chocolate to redo it without going back out to the supermarket, than these would have been one of the easiest and best brownies ever. The peppermint sandwich cookies that are used in this recipe give the brownies a little extra something special. You could also used plain chocolate sandwich cookies and these brownies would still be top notch, yummy and fudgy. Everyone that has tried these brownies find them so special, this unusual twist to include the peppermint just are that little something that push these brownies to another level. The original recipe can be found here. I did not make many changes to this recipe, but you can look at both and decide for yourself which to follow. Both will turn out well.


Peppermint Jo Jo Brownies
1 cup butter softened
6 oz. unsweetened chocolate
3 cups sugar
1/2 tsp salt
2 tsp vanilla extract
4 large eggs
1 2/3 cups all purpose flour
1/3 cup unsweetened cocoa powder
3 1/2 cups broken peppermint oreo-type cookies*

*I used Peppermint Jo Jo's which are Trader Joes version of Oreo cookies, but you can use any brand that you have handy or you like.

Preheat your oven to 350 degrees, and grease and foil a 9 by 13 inch brownie pan with either Pam or butter. The foil makes it so much easier to just lift the brownies right up out of the pan, and therefore easier to cut.

In a medium-large saucepan over low heat melt together butter and chocolate, stirring occasionally until fully melted and mixed together. DO NOT TAKE YOUR EYES OFF OF THE MIXTURE (it may burn :(.) Whisk in sugar, salt and vanilla while still over the low heat. Once combined turn off the heat. Whisk in eggs one at a time, waiting until each is fully incorporated before adding the next. Next, Stir in flour and cocoa powder until mixture is throughly combined. Stir in broken peppermint oreo cookies and pour batter into prepared pan. Then break an additional hand full of cookies (5 or 6)and distribute evenly and randomly on top of the batter. Make sure that the cookie pieces are not too big, or it will be more difficult to cut the brownies later.

Bake for about 40 minutes, until a toothpick inserted into the center comes out with moist crumbs, but not coated with batter, this will really depend on your oven, so I would start looking at 35 minutes, but mine really took closer to 45-50 minutes before fully cooked. Make sure you do not over bake or you will end up with dry not fudgy brownies.

Cool brownies in pan until just warm to touch. Lift brownies in the foil out of the pan and place on a wire rack to cool completely before slicing, you could even put them in the refrigerator to really harden up for an hour before cutting.

Cut, serve, enjoy or freeze :)


The one thing you have to remember about freezing brownies opposed to cookies is that brownies take a longer time to defrost so they may need a few hours out of the freezer before serving. You don't want to people to bite into frozen brownies.

Easter Sunday for a Jewish Girl

What to bring to Easter...hmmm. I dunno, colored eggs baked into bread and other foods is too flamboyant for me. I don't exactly even know what this holiday is all about, something about Jesus I'm going to guess. So Easter for a Jewish girl who loves to bake cookies means, a plate full of cookies, 6 different kinds to be exact. The plate that I'm bring will include: Best Damn Chocolate Chip Cookies, Peppermint Jo Jo Brownies, Giant Chewy Ginger Cookies, Espresso Chocolate Shortbreads, Peanut Butter Chocolate Chippers (Ben's favorite) and Everything Chocolate Cookies. I'm going to make each a separate post so that each of the recipes have their own link. It may also take me a few days to get through them all. But here is the finished plate.


Here's the secret. Frozen cookies. When you make a batch of cookie put some or all right into the freezer, then you have a stock of many different kinds of cookies that you can always pull out and present all pretty like.

Wednesday, March 19, 2008

Chinese Food, but not Take Out?

The title of this post may confuse you. Well, I as well was throughly confused by the extreme yumminess of this dish. It was so good, and Ben and I were so proud of our selves. It tasted exactly like General Gao's Chicken, except not fried, didn't cost 8 dollars a dish and was healthy. I know I know all things that don't seem to be real. But its true. It was a great experiment, if only we had made more.


The credit to this dish has to go to Kevin, on his blog I found the original recipe, and made a few changes to it. I thought that the pineapple juice may have too strong of a flavor and over power some of the other more delicate flavors of this dish. I'm always worried about too much pineapple juice, it can make a good cocktail go south with just a splash too much, so I substituted orange juice to keep some acidity. I also wanted to add in chili flakes for a little more heat along with the ginger. I wouldn't make any changes to the recipe the way that mine came out. We both thought it was spectacular.


General Gao's Chicken (Healthy Style)

1 lb chicken (cut into strips)*
4 tbsp light soy sauce
4 tbsp orange juice**
1 tbsp honey
1 tbsp dark brown sugar
1 1/2 tbsp minced ginger root
1/8 tsp chili flakes
Pam
1 tsp sesame seeds

*We used the precut "stir-fry chicken strips" that you can buy in the supermarket
**Our orange juice turned out to be a month old, so we just freshly squeezed an orange, either will work.

Mix soy, juice, ginger, honey, sugar, chili flakes and chicken in a zip lock bag and marinate for 45 minutes in the refrigerator. This allows the flavors to start melding together and breaking into the chicken.

Once you have let the chicken marinate Pam a sautee pan and add all chicken and marinate to it, should be over high heat. Chicken will cook through and sauce will start to thicken in about 8 to 10 minutes. During this time we also cooked up some boil-in-the-bag brown rice to go with our chicken. When the sauce is thick turn off the heat and place on top of a mound of rice. Garnish the chicken with the sesame seeds.


Mmmm, mmmm, mmmm so good.

Tuesday, March 18, 2008

Sweet Sticky and Healthy?

Yams. Just think about it for a minute, besides candied yams at the holiday times, when was the last time you just baked up a yam, sprinkled a little kosher salt and pepper on it and ate it? Not recently? No well, go do it now. Tonight. As soon as possible.


Growing up I always thought I was eating sweet potatoes, well that what we called them, but they were yams, a better flavor, color and taste than sweet potatoes. I loved them. It was one of those things that I would always eat. My mom would tell you growing up I was not the easiest of kids to feed, but one thing I loved was anything sweet: candy, chocolate and YAMS!

This week while taking a trip to the supermarket to restock everything I passed by the potatoes, sweet potatoes, and yam section and realized it had been forever since I had made a yam, and instantly picked up a good size one and was on my way. Last night I wasn't sure what I wanted to eat and started snacking once I had gotten through the candy and the crackers and other snacks, I thought I should complete this snack filled dinner with a healthy snack. We all have those nights where it just feels better to snack all night than to make a full meal. Well add a yam to this, and it makes snacking for dinner nutritious as well. Yams are also a good substitute for a regular potato side dish. It just adds that extra something special to a boring chicken and potato meal, and makes a sticky sweet side to any meal.

Baked Yam


1 Yam (or however many for the number of people you need to feed)
kosher salt
pepper

Make sure you wash your yam and dry it to try and get off as much dirt as possible. Bake the Yam in a 375 to 400 degree oven, just like you would a baked potato. Depending on the size of the yam...they do tend to be a bit bigger than potatoes, let it bake for about 1 hour 15 minutes to 1 1/2 hours. Keep an eye on it. It should be very soft to touch when cooked fully. Once cooked slice in half sprinkle with kosher salt and a dusting of pepper (you can omit the pepper if you want the full taste of the yam to come through.) And eat! Yams are so good and they don't need anything to dress them up or show them up, turn them into something else. They are perfectly gooey and sweet and yummy all on their own.


So try this out, plain and simple, baked yams.

Sunday, March 9, 2008

Pizzeria Calvin

We've been talking about making pizza for dinner the past couple nights, that means that eventually we'll get around to it. Maybe we have to build up the idea in our head, or build the want and need for fresh home-made pizza. The need, want and eagerness were all present tonight. A trip to Pizzeria Calvin (ok Ben's kitchen) for both deep dish and thin crust pizza. That's one of the best things about making home-made pizza you can tailor it to your taste you can add toppings without making it a 20 dollar pizza and you can enjoy the freshness and joy of making pizza just as good, or better than you're local joint.


We cheat. Let's just put it out there. I should give you my recipe for pizza dough and tell you I let it rise and kneaded it. But for $1.89 (thats how much ours cost) you can buy a ready made pizza dough in the refrigerated section of any grocery store. This dough say 11 servings, but Ben and I turned out 2 medium size pizzas from one bag. We also bough fresh made pizza sauce from our grocery store. It was a very basic sauce, vine ripened tomatoes, oils, oregano and spices. That was all was in the sauce we used. This was a really fun dinner that got both of us in the kitchen cooking, tossing pizza dough in the air, and having a good time. I recommend this for families or a date night. Simple, easy and good.


Almost Everything Healthy Toppings Pizza
1 bag refrigerated dough
1 container pizza sauce
1 package part skim mozzarella
1 green bell pepper
7 or 8 chopped mushrooms
2 vine ripened tomatoes
1 medium onion
1 chicken breast*

*You can either buy the ready made refrigerated chicken slices or do what we did quickly sautéed a breast with just salt and pepper, and cut into strips.


I recommend first chopping all of your veggies so that they are the right size to go on your pizza, this will make assembly a lot faster. If you want to make 2 separate pizzas like we did, you should divide your dough in half, or into as many pizzas as you want. Then stretch your dough. The best way is to get your dough on your finger tips and pill slightly to stretch it into a circle. Don't forget to rotate so that you get almost a circle. If you are brave you can toss the dough in the air. Ben was good at it. Me not so much. You want it pretty thin, about or a little less than 1/8 inch thick.


I added the pizza sauce to the top of my dough on a Pamed pan. I added my first layer of cheese and then topped off my pizza with all of the raw veggies and the sauteed chicken breast pieces and then another layer of cheese just to top it off.


Ben wanted a deep dish pizza, he used a 9 inch round cake pan. He stretched the dough so that it would just hang over the edge of the pan but slightly dip into the corners so that he would get a nice edge on his pizza. He put down sauce, all the toppings and then more sauce and a thick layer of cheese. We baked both at 450 degrees, Ben's the deep dish went for about 20 minutes while mine was about 15. I think Ben's came out looking professional. They both tasted amazing. Fun, Healthy, Easy, and cheap, what more could you want?

Monday, March 3, 2008

Best Damn Chocolate Chip Cookies Ever

OK, I know, I know its a big claim to have the best chocolate chip cookies in the entire world. But I have it. And I'm sharing it with you. I thought about keeping it a secret, and just keeping the recipe to myself, and close family members but I want you to also be able to have a dynamite recipe that never fails to please. I have made these for co-workers, family get-togethers, for holiday cookie packages, and just for everyday treats. Everyone loves them, and you cannot eat just one. So I'd recommend that you make a double batch.

I also keep a full batch of these cookies frozen in case of a cookie emergency. They freeze and defrost very well. Cookies will stay for several months in the freezer and you just have to take them out a few hours before serving, they will taste exactly the same as just out of the oven.


Best Damn Chocolate Chip Cookies Ever

2 1/2 cups all-purpose flour
1 tsp baking soda
3/4 tsp salt
1 cup unsalted butter (softened)
1 cup dark brown sugar
1/2 cup granulated sugar
2 eggs
2 tsp vanilla extract
16 oz semi-sweet chocolate chips

Preheat your oven to 350 degrees, and take out your cookie sheets, I would recommend that you do not grease these pans for baking.

Combine all of your dry ingredients (flour, baking soda and salt) in a medium sized bowl, and set aside.

Cream softened butter, you can either take your butter out to sit on a counter a few hours before baking or pop it in the microwave for a few seconds. Please make sure you do not melt the butter, and do not use hard butter, the consistency of the butter will affect the texture of the cookies. If you melt your butter the cookies will tend to come out flatter and crispier. These cookies are made to be chewy. Beat butter until smooth, add both sugars and mix until a little fluffy. Make sure to scrape down the sides of your bowl so that all the sugar and butter have fully combined.

Add each egg in one at a time, and let the first one fully incorporate before adding the second. Then add in the vanilla extract, and again scrape down the sides and make sure everything is evenly mixed together.

Gradually add in the flour mixture and beat just until combined. Stir or fold in the chocolate chip cookies. (I reserve about 5 chocolate chips to the side...these are for later use.)

Drop cookie dough on to baking sheet. I use an ice cream scoop that is about two tablespoons, but depending on what size cookies you want you can use a single tablespoon scoop, and you will get about 36 cookies. I usually get about 24 cookies per batch. I find that the last cookie that pull from the mixing bowl you are usually scraping the sides trying to get every last bit of dough, but there are generally no chocolate chips in this last dough ball. This is where those few extra chocolate chips come in handy. I mix those into the last bit of dough to get that final cookie, you can't waste cookie dough. Bake for 15 minutes until the edges of the cookies are golden. Let cool on the cookie sheets for a minute before transferring to a wire rack for cooling. Eat and enjoy.


To freeze these cookies make sure that they are fully cooked before putting them in the freezer just so that there is not any condensation in the storage container this can make your cookies soggy. I put a layer of wax paper between each layer of cookie and try not to have the cookies touching so that when they are frozen they will not all be stuck together.